Activity 3: Svelte Props
Practice and reinforce the concepts from Lesson 3
Svelte Props
What you'll learn
- How to create and use props in Svelte components
- Passing data from parent to child components
- Using
export letto define component props - Working with object spread syntax for multiple props
- Creating reusable components with dynamic data
Total Activity Time: 45 minutes
Before You Begin:
- Go to Svelte REPL
- Remove all existing code before starting the exercises
- Click the + symbol button to add new files when needed
- Rename files by clicking on the file tab name
💡 Tip Make sure to save your work periodically in the Svelte REPL by bookmarking your playground URL!
Steps to Create Your Svelte Props Projects
💻 Activity One: Player Score Tracker
Time: 15 minutes
Svelte REPL - Remove all existing code before starting
Let's create a simple player score tracker component.
Steps:
- Create a new component file called
Score.svelte - Add the provided code for Score.svelte with exported props for
playerandscore - Import the Score.svelte component to app.svelte
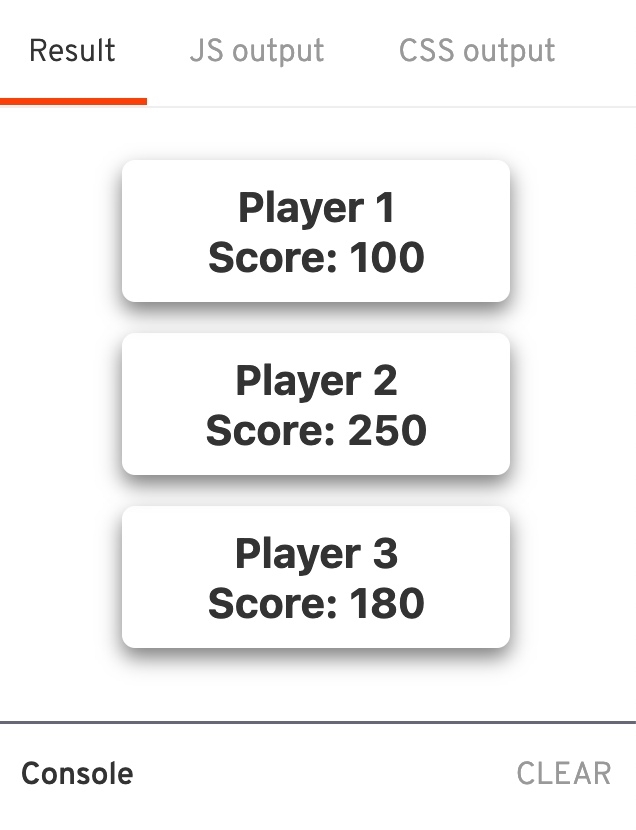
- Create three player instances:
- Player 1 with a score of 100
- Player 2 with a score of 250
- Player 3 with a score of 180
💡 Tip Use
export letto create props that can receive data from parent components. This is the standard way to define props in Svelte!
Score.svelte:
php-template
<script>
   export let player;
   export let score;
</script>

<div>
   <p>Player {player}</p>
   <p>Score: {score}</p>
</div>

<style>
div{
    box-shadow: 0 4px 8px 0 rgba(0,0,0,0.5);
    padding: 0.5rem;
    margin: 12px 40px;
    border-radius: 5px;
    text-align: center;
    font-weight: bold;
}

p{
    margin: 0;
}
</style>
app.svelte:
php-template
<script>
    import Score from "./Score.svelte";
</script>

<Score player="1" score="100" />
<Score player="2" score="250" />
<Score player="3" score="180" />
If you've done it correctly, it should look like this:
💻 Activity 2: Multiply Calculator
Time: 10 minutes
Svelte REPL - Remove all existing code before starting
Let's create a simple multiply calculator component that accepts two numbers and displays their product.
Steps:
- Create a new component file called
Multiply.svelte - Declare and export 2 props called
num1andnum2 - Create a variable called
answerthat calculatesnum1 * num2 - Display the multiplication equation in a paragraph tag
- In app.svelte, import and use the Multiply component with number props
💡 Tip You can calculate values using exported props within the same script section. Svelte will automatically update the calculation when props change!
Multiply.svelte:
php-template
<script>
   export let num1;
   export let num2;
   let answer = num1 * num2;
</script>

<p>{num1} x {num2} = {answer}</p>
app.svelte:
php-template
<script>
    import Multiply from "./Multiply.svelte";
</script>

<Multiply num1="3" num2="8" />
If you've done it correctly, it should look something like this:
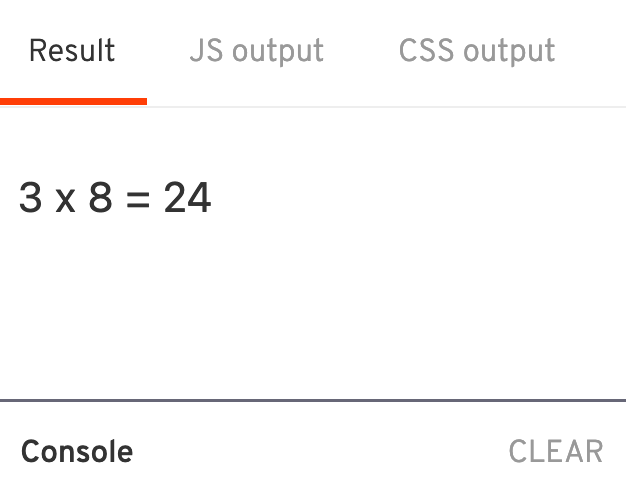
Assuming num1 is 3 and num2 is 8.
💻 Activity 3: Advanced - Student Card with Object Props
Time: 20 minutes
Svelte REPL - Remove all existing code before starting
Create a student card component that accepts multiple props using object spread syntax.
Steps:
- Create a new component file called
Card.svelte - Export the following props:
school,name,studentID, andyear - Use the provided styling and layout code
- In app.svelte, create an object variable containing all student data
- Pass the object properties to the Card component using spread syntax
⚠️ Warning Important: You must use object spread syntax
{...objectName}to pass all props at once, not individual props!
💡 Tip Object spread syntax is great when you have many props to pass. It helps keep your code clean and maintainable.
Card.svelte:
php-template
<script>
   export let school;
   export let name;
   export let studentID;
   export let year;
</script>

<div class="card">
   <h1>{school}</h1>
   <p class="stu">Student</p>
   <h1>:)</h1>
   <p>{name}</p>
   <p>{studentID}</p>
   <p>INTAKE: {year}</p>
</div>

<style>
.card {
    box-shadow: 0 4px 8px 0 rgba(0,0,0,0.5);
    padding: 2px 16px;
    margin: 12px 4px;
    border-radius: 5px;
    text-align: center;
    font-weight: bold;
}
</style>
app.svelte:
php-template
<script>
    import Card from "./Card.svelte";

    let studentData = {
        school: "Telebort Academy",
        name: "John Doe",
        studentID: "TB2024001",
        year: "2024"
    };
</script>

<Card {...studentData} />
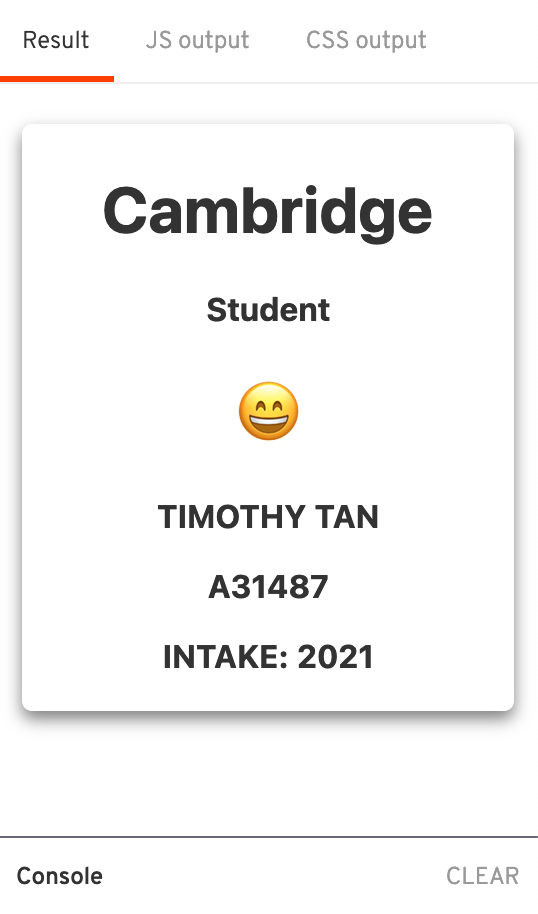
If you've done it correctly, it should look something like this:
Required Elements
✅ Make sure your Svelte Props projects include:
- Activity 1: Score component with exported props displaying three player cards
- Activity 2: Multiply component with calculation using props and showing results
- Activity 3: Student card component using object spread syntax to pass props
- All components properly export props using
export let - Props are correctly passed from parent components
- Styling is applied and components display properly
Tips for Success
💡 Tip
- Always use
export letto create props in Svelte components- Props can be strings, numbers, or any JavaScript value
- Use object spread syntax
{...obj}to pass multiple props efficiently- Calculated values can be derived from props within the same script section
- Test your components with different prop values to ensure they work correctly
Troubleshooting
Common Issues:
-
"Cannot read property of undefined"
- Make sure you're passing all required props from the parent component
- Check that prop names match exactly (case-sensitive)
-
Props not updating
- Ensure you're using
export letin the child component - Verify prop names are spelled correctly in both parent and child
- Ensure you're using
-
Spread syntax not working
- Check that your object property names match the exported prop names exactly
- Make sure you're using the correct syntax:
<Component {...objectName} />
-
Styling not appearing
- Ensure you've included the
<style>section in your components - Check for any syntax errors in your CSS
- Ensure you've included the
Project Submission
ℹ️ Ready to submit? Make sure you've completed all three activities and tested your components thoroughly!
When you have completed your "Svelte Props" projects, submit them using the link below:
📤 Submit Your Projects Here
Before submitting, verify:
- All three activities are complete and working
- Components display correctly with different prop values
- Code follows the provided examples and requirements
- Your Svelte REPL playground URL is saved
⚠️ Warning Test all components with different prop values and verify they display correctly in the Svelte REPL before submitting!
Need help? Watch the Code Review: