Activity 2: Svelte Components
Practice and reinforce the concepts from Lesson 2
Svelte Components
What You'll Learn
In this hands-on activity, you will:
- Create your first Svelte component with styling
- Work with variables and dynamic content
- Import and use components in other components
- Build a complete webpage with header, content, and footer
- Practice component-based architecture in Svelte
Total Time: 45-60 minutes
💻 Getting Started
Before You Begin:
- Open the Svelte REPL in your browser
- Remove all existing code from the editor
- Click the + symbol button to add new files when needed
- Rename files by clicking on the file tab name
💡 Tip The Svelte REPL automatically saves your work. You can share your project by copying the URL from your browser!
Important Setup:
Set up your file structure as shown in the image below:

Activities
💻 Activity One: First Svelte Exercise - Welcome Page
Time: 10 minutes
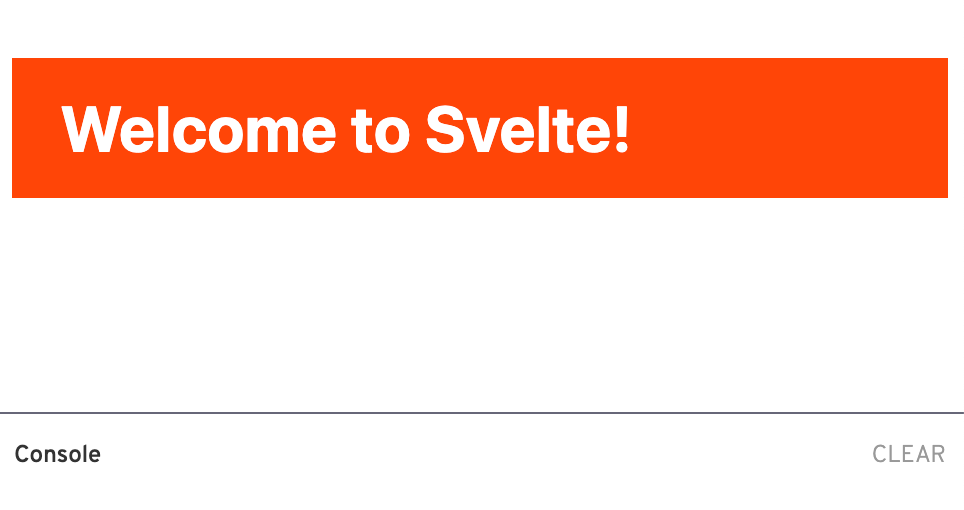
Let's create your first Svelte component with styling!
- In the
app.sveltefile, add a<h1>tag with the text "Welcome to Svelte!" - Below your HTML, add a
<style>tag - Inside the style tag, add these styles for the
<h1>:background-color: OrangeRed;color: white;padding: 16px 24px;
💡 Tip In Svelte, styles written in a component are automatically scoped to that component only. This means your h1 styles won't affect other components!
Expected Code:
php-template
<h1>Welcome to Svelte!</h1>

<style>
    h1 {
        background-color: OrangeRed;
        color: white;
        padding: 16px 24px;
    }
</style>
Your Result Should Look Like This:
💻 Activity 2: Adding Images with Variables
Time: 10 minutes
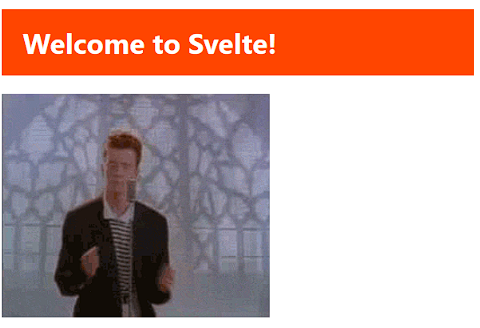
Now let's learn how to use JavaScript variables in Svelte components!
- At the very top of your
app.sveltefile, add a<script>tag - Inside the script tag, declare a variable:
let src = '/tutorial/image.gif'; - Below your
<h1>tag (but above the<style>tag), add an image:- Use
<img>tag withsrc=\{src\} - Add
alt="dance"attribute
- Use
💡 Tip The curly braces
\{\}tell Svelte to use the JavaScript variable value. You can also use the shorthand\{src\}instead ofsrc=\{src\}when the attribute name matches the variable name!
Expected Code:
php-template
<script>
    let src = '/tutorial/image.gif';
</script>

<h1>Welcome to Svelte!</h1>
<img {src} alt="dance">

<style>
    h1 {
        background-color: OrangeRed;
        color: white;
        padding: 16px 24px;
    }
</style>
Your Result Should Look Like This:
💻 Activity 3: Creating and Importing Components
Time: 15 minutes
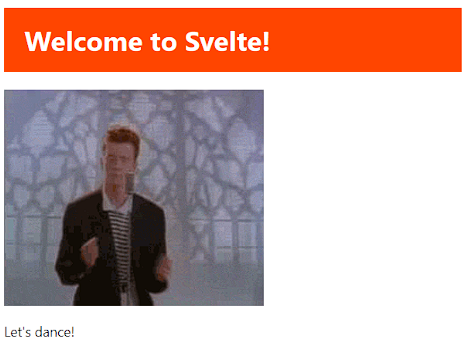
Let's practice component-based architecture by creating a separate component!
- Click the + button in the Svelte REPL to create a new file
- Name it
About.svelte - In
About.svelte, add:<p>Let's dance!</p> - Back in
app.svelte:- Add this import at the top of your
<script>tag:import About from "./About.svelte"; - Below your
<img>tag, add:<About />
- Add this import at the top of your
💡 Tip Component names must start with a capital letter in Svelte. This is how Svelte distinguishes between HTML elements and custom components!
Expected Code:
About.svelte:
css
<p>Let's dance!</p>
app.svelte:
php-template
<script>
    import About from "./About.svelte";
    let src = '/tutorial/image.gif';
</script>

<h1>Welcome to Svelte!</h1>
<img {src} alt="dance">
<About />

<style>
    h1 {
        background-color: OrangeRed;
        color: white;
        padding: 16px 24px;
    }
</style>
Your Result Should Look Like This:
💻 Activity 4: Advanced - Footer Component with Styling
Time: 15 minutes
Let's create a more complex component with its own variables and styling!
- Create a new file called
Footer.svelte - In
Footer.svelte:- Add a
<script>tag with:let name = "Rick"; - Add a
<footer>tag containing:<p>Copyright © 2022 \{name\}</p> - Add a
<style>tag with footer styling:background-color: OrangeRed;color: white;padding: 8px 24px;
- Add a
- In
app.svelte:- Import Footer at the top of your script
- Add
<Footer />at the bottom
💡 Tip Each Svelte component can have its own script, markup, and styles. The styles are automatically scoped, so your footer styles won't affect other components!
Expected Code:
Footer.svelte:
php-template
<script>
let name = "Rick";
</script>
<footer>
<p>Copyright © 2022 {name}</p>
</footer>
<style>
footer {
background-color: OrangeRed;
color: white;
padding: 8px 24px;
}
</style>
app.svelte (Final Version):
php-template
<script>
    import About from "./About.svelte";
    import Footer from "./Footer.svelte";
    let src = '/tutorial/image.gif';
</script>

<h1>Welcome to Svelte!</h1>
<img {src} alt="dance">
<About />
<Footer />

<style>
    h1 {
        background-color: OrangeRed;
        color: white;
        padding: 16px 24px;
    }
</style>
Your Final Result Should Look Like This:
✅ Checklist
Before submitting, ensure your project includes:
- Activity 1: Styled welcome heading with orange background
- Activity 2: Dancing GIF displayed using a JavaScript variable
- Activity 3: Separate About component properly imported
- Activity 4: Footer component with dynamic name and styling
- All variables declared using
letsyntax - All components properly imported in app.svelte
- Project runs without errors in Svelte REPL
🛠️ Troubleshooting
Having issues? Check these common problems:
- Component not showing? Make sure you imported it and the component name starts with a capital letter
- Styles not applying? Remember that styles in Svelte are scoped - they only affect elements in the same component
- Image not loading? Check that you're using the correct path:
/tutorial/image.gif(note the leading slash) - Curly braces showing as text? Make sure you're using single curly braces
\{variable\}not double
📤 Project Submission
⚠️ Warning Before submitting:
- Test all four activities in your Svelte REPL
- Make sure all components display correctly
- Copy your project URL from the browser address bar
When you have completed your "Svelte Components" project, submit it using the link below:
📺 Additional Resources
Code Review: 
ℹ️ Info Need help? Remember to:
- Review the troubleshooting section above
- Check that your code matches the expected examples
- Watch the code review video for additional guidance