Concept 15: Drawing with OpenCV
Drawing on Images
:dart: Learning Objectives
By the end of this lesson, you will be able to:
- Understand how OpenCV handles image coordinates
- Draw rectangles on images to highlight objects
- Draw circles to mark specific points
- Draw lines to show connections or paths
- Add text labels to your images
:information_source: What is Drawing on Images? Drawing on images means adding shapes, lines, or text to an image. This is how we show the results of computer vision tasks like object detection or face recognition.
:art: Why Do We Draw on Images?
We draw on images to show what our computer vision programs found. For example:
- Object Detection: Draw boxes around objects we found
- Face Detection: Draw rectangles around faces

:emoji: Understanding Image Coordinates
Before we start drawing, let's learn how OpenCV locates points on an image:
:memo: Coordinate System
- X-axis: Goes from left to right (horizontal)
- Y-axis: Goes from top to bottom (vertical)
- Origin (0,0): The top-left corner of the image

:bulb: Getting Started Before we start drawing, make sure you have OpenCV installed and imported in your Python code:
pythonimport cv2 as cv
:hammer_and_wrench: Drawing Tools We'll Learn
In this lesson, we'll master four essential drawing tools:
- Rectangle - Perfect for bounding boxes
- Circle - Great for marking points of interest
- Line - Useful for showing connections
- Text - Essential for adding labels
:package: Drawing Rectangles
Rectangles are the most common shape we draw. They're perfect for showing where objects are located.
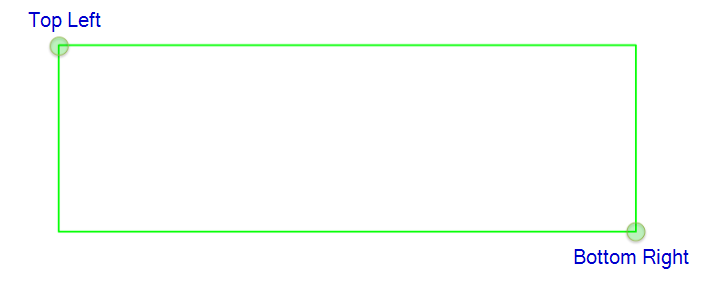
Rectangle Syntax
python
cv.rectangle(image, top_left_point, bottom_right_point, color, thickness=thickness)
Parameters Explained:
- image: The image you want to draw on
- top_left_point (x,y): Where the rectangle starts (upper-left corner)
- bottom_right_point (x,y): Where the rectangle ends (lower-right corner)
- color (b,g,r): The rectangle's color in BGR format (Blue, Green, Red)
- thickness: How thick the rectangle's border should be (in pixels)

Example: Drawing a Green Rectangle
Let's draw a green rectangle in the top-left corner:
python
# Draw Rectangle
cv.rectangle(img, (0, 0), (50, 50), (0, 255, 0), thickness = 2)
:bulb: Color Values Remember: OpenCV uses BGR (Blue, Green, Red) instead of RGB!
- (0, 255, 0) = Pure Green
- (255, 0, 0) = Pure Blue
- (0, 0, 255) = Pure Red
⭕ Drawing Circles
Circles are great for marking specific points or creating rounded highlights.
Circle Syntax
python
cv.circle(image, center_point, radius, color, thickness=thickness)
Parameters Explained:
- image: The image you want to draw on
- center_point (x,y): The center of your circle
- radius: How big the circle should be (in pixels)
- color (b,g,r): The circle's color in BGR format
- thickness: How thick the circle's border should be

Example: Drawing a White Circle at Center
Let's draw a white circle in the middle of our image:
python
# Draw Circle
cv.circle(img, (image.shape[1]//2, image.shape[0]//2), 100, (255, 255, 255), thickness = 4)
:memo: Finding the Center
image.shape[1]//2gives us the horizontal center (width / 2)image.shape[0]//2gives us the vertical center (height / 2)//means integer division (no decimals)
:emoji: Drawing Lines
Lines help us connect points or show directions and paths.
Line Syntax
python
cv.line(image, starting_point, ending_point, color, thickness=thickness)
Parameters Explained:
- image: The image you want to draw on
- starting_point (x,y): Where your line begins
- ending_point (x,y): Where your line ends
- color (b,g,r): The line's color in BGR format
- thickness: How thick the line should be (in pixels)

Example: Drawing a Blue Diagonal Line
Let's draw a thick blue line going diagonally:
python
# Draw Line
cv.line(img, (0, 50), (250, 250), (255, 0, 0), thickness = 10)
:bulb: Line Uses Lines are perfect for:
- Showing connections between objects
- Drawing paths or trajectories
- Creating simple diagrams
:pencil2: Writing Text
Adding text labels makes your images more informative and easier to understand.
Text Syntax
python
cv.putText(image, text, starting_point, font_style, size, color, thickness=thickness)
Parameters Explained:
- image: The image you want to write on
- text: What you want to write (as a string)
- starting_point (x,y): Where the text begins (bottom-left corner)
- font_style: The font type (OpenCV has several built-in fonts)
- size: How big the text should be (1.0 is normal size)
- color (b,g,r): The text color in BGR format
- thickness: How bold the text should be

Example: Writing Red Text
Let's write "Telebort" in red with a fancy font:
python
# Write Text
cv.putText(img, "Telebort", (100,100), cv.FONT_HERSHEY_COMPLEX, 2.0, (0, 0, 255), thickness = 3)
:memo: Font Styles OpenCV includes several font styles:
cv.FONT_HERSHEY_SIMPLEX- Simple and cleancv.FONT_HERSHEY_COMPLEX- More decorativecv.FONT_HERSHEY_PLAIN- Very basicFor more font styles, check out: Fonts in OpenCV
:memo: Summary
You've learned four powerful drawing tools in OpenCV:
- Rectangles - Perfect for bounding boxes around detected objects
- Circles - Great for marking important points
- Lines - Useful for showing connections or paths
- Text - Essential for labeling your detections
These tools are the foundation for visualizing computer vision results. Every time your program detects something, you can use these tools to show what was found!
:emoji: Video Tutorial
:emoji: AI Prompt
Code with AI: Try using AI to learn OpenCV drawing functions.
Prompts:
- "How do I draw basic shapes (lines, rectangles, circles) using OpenCV?"
- "Write Python code to add text on images using OpenCV's putText function."
- "Show me how to create custom drawings by combining different OpenCV drawing functions."
:dart: Practice Time!
Try these exercises to master drawing with OpenCV:
- Traffic Light Challenge: Draw three circles (red, yellow, green) vertically aligned like a traffic light
- House Drawing: Use rectangles and triangles to draw a simple house
- Face Annotation: Load a photo and draw a rectangle around a face, then add a text label
- Connect the Dots: Create a pattern by drawing lines between multiple points
:bulb: Remember
- Always test your coordinates on a small scale first
- Use different colors to make your drawings stand out
- Combine multiple shapes to create complex drawings
