Concept 10: Event
Events
:dart: Learning Objectives
By the end of this lesson, you will be able to:
- Understand what events are and why they make websites interactive
- Identify common types of events (click, keypress, mouseover, etc.)
- Use three different methods to handle events in JavaScript
- Apply the addEventListener() method as the best practice
- Work with event arguments to get event details
:information_source: What are Events? Events in JavaScript are actions that happen on your webpage. They're part of the DOM (Document Object Model) and let your code respond when users interact with your website.
Think of events as signals - when a user clicks a button, types on the keyboard, or moves their mouse, JavaScript can "listen" for these signals and respond!
Events are actions that users perform, such as:
- Clicking a button
- Typing on the keyboard
- Moving the mouse over an element
- Scrolling the page
Common Events
These are some of the common event (actions):
| Events | Description |
|---|---|
| click | When the user clicks on an HTML element such as a button. |
| keypress | When the user pressed on a key on the keyboard. |
| keydown | When the user is pressing down a key on the keyboard. |
| keyup | When the user releases their hands off the keyboard key. |
| mouseover | When the cursor is over an element. |
| mouseout | When the cursor is out of an element. |
There are actually more DOM HTML events available. You can check the entire list here: https://www.w3schools.com/jsref/dom_obj_event.asp

Event Handlers
The event handler is a function that will run when the event (action) is triggered.
In the past chapters we have been using one of the ways to add an event. Let's look at the examples to understand the concept.
There are actually 3 ways to assign an event:
Method 1: HTML Attribute
In this example, we will add an event using event handler attributes.
For instance, to assign a click handler for an input, we can use onclick, like here:
html
<button onclick="alert('Hello')">Click me</button>
On mouse click, the inline JavaScript will run.
This is just an example of what we've been using.
Problems:
- Putting JavaScript inside index.html is a bad practice.
- Sometimes the HTML will load faster than the JavaScript and this will cause errors if the user interacts before the JavaScript loads.
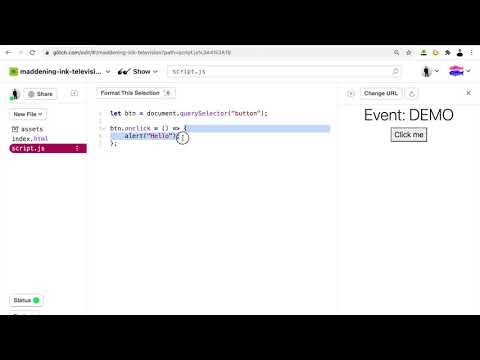
Method 2: DOM Property
In this example, we will add an event using the HTML DOM property.
For instance, we can add the event by using DOM .onclick property:
index.html:
html
<button>Click me</button>
script.js:
javascript
var btn = document.querySelector("button");

btn.onclick = () => \{
    alert("Hello");
\};
On mouse click, it will run a function.
Problems:
- We can't write more than one event handler.
Method 3: addEventListener() Method
This is the best method compared to previous examples because we can have multiple handlers for a particular event.
Here is the syntax for the .addEventListener() method:
javascript
element.addEventListener(event, handler);
- The first argument event is the action. Do note that the event does not need an "on" keyword before it.
- The second argument handler is the function that will be called when the action happens.
In this example, we will add an event using the .addEventListener() method:
index.html:
html
<button>Click me</button>
script.js:
javascript
var btn = document.querySelector("button");

btn.addEventListener("click", () => \{
    alert("Hello");
\});

btn.addEventListener("click", () => \{
    alert("How are you?");
\});

On mouse click, it will run 2 functions because there are 2 event handlers.
Multiple Events
Of course, we can also have multiple different events and handlers together:
javascript
document.addEventListener("mouseover", myMouseover);
document.addEventListener("click", myClick);
Attaching to Body
It is actually very common to attach an event listener to the body tag.
Sometimes we don't need to specifically attach to a particular element so we just attach an event listener to the body:
javascript
document.body.addEventListener("keypress", myKeypress);
Event Arguments
Some events might be useful by parsing an argument to the handler. This is most commonly used to detect what key is pressed.
javascript
document.body.addEventListener("keypress", (e) => \{
    console.log(e.key);
\});
By having an argument called e, we can get the event's properties such as the keyboard event .key property.
Summary
| Method | Pros | Cons | Example |
|---|---|---|---|
| HTML Attribute | Simple to understand | Bad practice, mixing HTML and JS | <button onclick="alert('Hi')"> |
| DOM Property | Separates HTML and JS | Only one handler per event | btn.onclick = handler |
| addEventListener() | Multiple handlers, best practice | Slightly more complex | btn.addEventListener("click", handler) |
Best Practices
- Always use
addEventListener()for event handling - Separate JavaScript from HTML (avoid inline event handlers)
- Use meaningful function names for event handlers
- Consider event arguments when you need event details (like which key was pressed)
Events are what make websites interactive and responsive to user actions!
Key Concepts Summary
- Events are user actions like clicks, key presses, and mouse movements that JavaScript can respond to
- There are three methods to handle events: HTML attributes, DOM properties, and addEventListener()
- addEventListener() is the best practice as it allows multiple event handlers and separates HTML from JavaScript
- Event handlers are functions that execute when specific events occur
- Events can be attached to specific elements or to the document body for global handling
- Event arguments provide additional information about the event, such as which key was pressed
- Proper event handling makes websites interactive and user-friendly